TMTM TFAR Guide
This guide will take you through setting up short-range (SR), long-range (LR), additional channels, and radio etiquette. One radio will be used for the pictures but it will apply to all other radios you will use in operations.
Short Range
Short-range radio is the main radio that most non-leadership roles will use during an operation.
Overview of the Radio
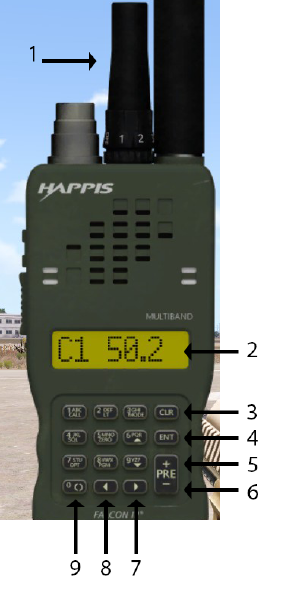
Fig. 1 Legend:
- - Decrease Volume | Increase Volume
- - Current Frequency
- - Clear Frequence
- - Set Frequency
- - Next Channel
- - Previous Channel
- - Speakers
- - Set Additional Channels
- - Stereo Settings
Basic Set-up
To bring up the radio press CTRL + P. To set up a radio simply highlight the text in the Current Frequency Slot (#2) and delete or type in your frequency of choice (set by Squad-lead or Commander) and then press Set Frequency (#4). Your radio should be set up, if you are not sure if it is working, hail your squad members (by pressing Caps Lock) over the radio to ask if you can be heard.
Advanced Set-up
This part builds off of the basic setup above, so this will continue from where the basic setup ends. After your radio is set up you can change the volume (#1) by clicking the black switch at the top. You can also change which ear or ears you want to hear the radio through with the Stereo Settings (#9) with the choices of left, right, or both ears. Last is the Speakers (#7) and you will more than likely never turn this on since it will annoy your squad members.
Short Range Additional Channels
Setting additional channels while confusing to some is relatively simple. This next example will help you walk through this process.
In this example, the main squad radio will be 220.00 while your team net radio is on 220.1
- Set your main radio channel (C1) to 220.1
- Go to the next channel by pressing next channel (#5)
- Set your second radio channel (C2) to 220
- Press Set Additional Channels button (#8)
- This will switch you from C2 (to the left of the 220) to A2
- Press the Previous Channel button (#6) to return to your main C1
- Test out the additional channel by pressing the default button of T
Long Range
This is the radio Commanders, Squad-leaders, and Vehicle elements will use to talk over a long distance. To bring up your long-range radio press ALT + P. Long-range and Short-range radios are similar in setting up so follow the above section for basic set-up or setting up additional long-range channels.
Overview of the Radio
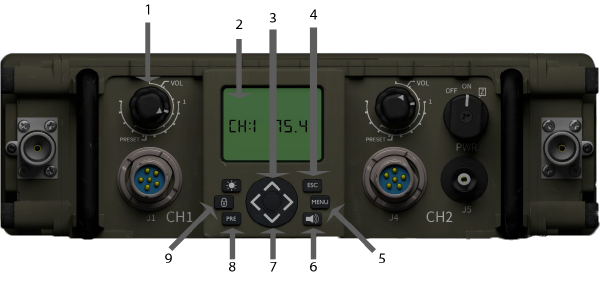
Fig. 2 Legend
- - Decrease Volume | Increase Volume
- - Current Frequency
- - Next Channel
- - Clear Frequency
- - Set Frequency
- - Speakers
- - Previous Channel
- - Stereo Settings
- - Set Additional Channel
Radio Etiquette
When communicating over the radio keep it precise and brief. Being precise helps briefness and briefness facilitates preciseness.
Precise
When hailing someone over the radio, being precise is key. You can do this through a variety of means.
- State who you are hailing, then who you are
- This is important to quickly get the attention of who you are trying to hail, and who is calling them
- It removes any question of who this message is for, and who it’s from
- Example
- “Command this is Alpha”
- If under enemy contact state direction and enemy forces
- A bearing or cardinal directions is good to quickly alert other members to a threat
- E.g. “Enemy Squad southeast” or “Enemy Squad bearing 271”
- Make sure it is relevant to your level of leadership
- For example you don’t want to be a SQL and alert Command about every soldier unless asked, keep it relevant
- A bearing or cardinal directions is good to quickly alert other members to a threat
- If you want to include the range of the enemy
- Have it ranged first before starting message
- Structure message in this order enemy, direction, range
- E.g. "Enemy man, northwest, 500 meters"
Brief
After being precise, being brief with radio messages help with the flow of information.
- Keep it short
- Try to convey your message in 10 to 20 seconds
- This helps with radio channels not being cluttered and orders being easier to hear and give
- Think before transmitting
- When under the gun people tend to ramble about their situation, just state the facts using what you learned above to quickly give a bearing on an enemy
Emergency Message
If you find yourself in a dire situation be precise and brief to quickly convey your message.
- Before transmitting
- Have a direction chosen
- Have a target or point picked out
- When transmitting
- Don't ramble, state the facts and shut up
- Structure your message like this "break break, this is [Name or Squad(if SQL), [message]"
- Do not abuse this, this is for emergencies only
Radio Terminology
Interrogative
- Prefacing a question
- E.g. "Command interrogative, [insert question here]"
Break Break
- Emergency, stop all communication
- E.g. "Break Break Alpha has a mass caz (Mass-casualty situation)"
Over
- I've finished talking and am waiting for a reply
- E.g. "Do you know when we can get a resupply, over"
Out
- I've finished talking, don't reply
- E.g. "I copy your last, Alpha out."
Copy
- I've heard and understood what you last said
- E.g. Commander finishes speaking "Alpha copies" or "Copy that"
Additional SR Radio Controls
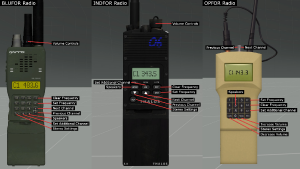
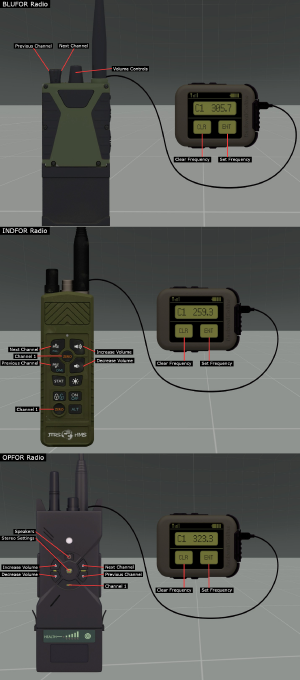
Click to expand these images for each type of short-range radio


