Mission Making Toolbox
TMTM Mission Making Toolbox
If you prefer to see the google docs version go here
1.Introduction
1.1 Overview
The purpose of this guide is to give you the skills and knowledge to make a basic operation for TMTM. There will be some basic scripting, but it will not cover advanced scripting topics. This will give you the tools to create an op that is playable and works properly. Additionally, this is not a tutorial to create the missions to the preference of any one person. The few sections where mission design is brought up is meant to encourage mindfulness and critical thought when designing your own op.
Look out for Design Opinion blurbs where mission makers offer design input about certain topics. These sections are neither right nor wrong, but simply advice from experienced mission makers.
There is a list on the top of this wiki that will let you jump to any section. If you are already familiar with making missions but are looking for something specific, feel free to jump to the relative sections. However, if you are making your first mission, it is strongly recommended that you go through this document section by section.
1.2 Setting Up the Editor
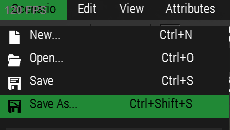
The first thing you’ll want to do is open up the editor and select what map you’d like to make a mission on. Click Scenario>Save As (or Ctrl+Shift+S) and save your mission.
Before even typing a name, make sure the box labeled Binarize the Scenario File is left unchecked. Leaving it checked will encrypt parts of your mission file and prevent either auditors or yourself from editing your mission.sqm should addon issues arise (while you are at it, go to Settings>Preferences in the editor and make sure that Binarize New Scenario Files is unchecked).
Its name doesn’t have to be final, but I typically prefix it with the type of mission I’m making and then give it a descriptive working title. Arma cannot read many special characters, most notably spaces (it replaces them with `%20`), so be sure to use underscores. Stick to standard letters, numbers, underscores, and dashes.
coop_zargabad_defense
coop_stratis_invasion
tvt_russian_rebels
cotvt_rogue_nato
Once you’ve done this, you can set up Superxpdude’s XP Template.
1.3 Setting Up the XP Template
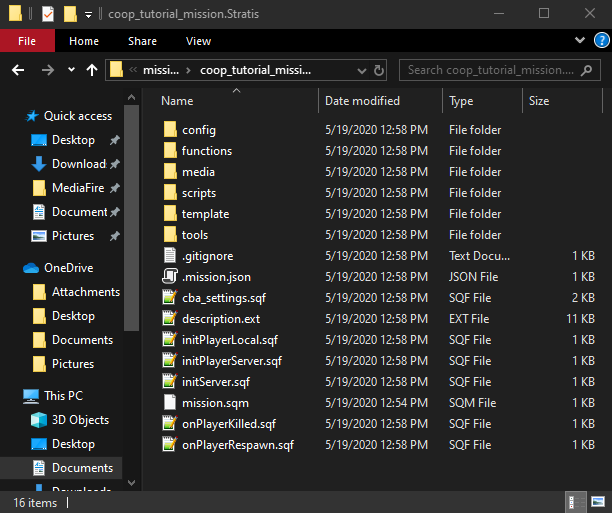
To set up the XP Template in your mission, navigate to the template repository and download the latest release as a zip file, then copy the contents into your mission directory. Your mission directory can be found in either Documents/Arma 3/missions or Documents/Arma 3 - Other Profiles/your username/missions. Take a minute or two to snoop around the files if you like, but we will be returning to the important parts later.
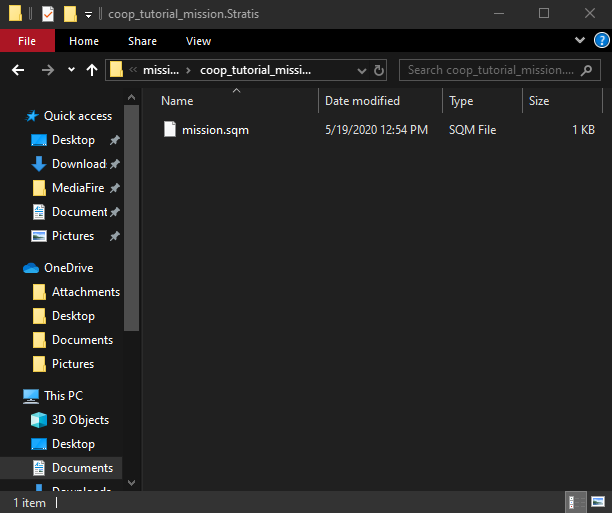
Left: Your mission folder just after its initial save
Right: Your mission folder after adding the XP Template
1.4 Description.ext
The description.ext file can be found in your mission root. This is the core of the information and settings of your mission. You are encouraged to explore it on your own, but for now we will only worry about several sections.
1.4.1 Mission Information
This section should be almost completely filled out (it doesn’t have to be when you start on your mission, but it most certainly has to be before submitting it for audit).
Mission naming procedures can be found in section 6.2 Naming Format. The onLoadName and onLoadMission entries can be much more informal.
minPlayers should always be 1, but maxPlayers should be equal to the number of playable units in the mission plus the number of Zeuses and headless clients (usually 3-6 extra slots). It is a good idea to future proof ops by having 50-60 slots available. It is always better to have too many slots than to have not enough on op night because If the number of players that show up for an op exceeds the number of slots in the mission, an alternative backup mission will be played instead.
1.4.2 Enable XPT Loadouts
Around line 35 is the line:
//#define XPT_DEFINE_CUSTOMLOADOUTS 1
Uncomment this line (remove the leading "//") to enable XPT Loadouts. You will get errors when you launch your mission if you try playing it as a unit that does not have a loadout defined in XPTLoadouts.hpp, so it might be worth doing this after setting up your loadouts.
1.4.3 Respawn Setup
Around line 95 is the Respawn section. Respawn should be set to 3, which will allow players to respawn at a point you specify in section 2.6 Respawns.
respawnDelay can be anything, but it is recommended NOT to go over 3 minutes. Keep in mind that this is the time spent at the respawn screen, not unconscious bleeding out, nor being transported back to the front.
2.Friendly Forces
2.1 Overview
When setting up the force composition for players you will need to form squads out of various roles, creating different types of squads by varying those squads. You will need to have a Command squad, infantry squads, and any sort of support or force multiplier squads.
Each unit you intend to be controlled by a player needs to have the "playable" box checked in its ‘unit attributes’ menu (this can also be done via the group’s attribute menu to avoid opening the attributes menu on each unit). You can group units together by clicking a unit once to select it, then ctrl+click and drag to the unit you want the selected unit to follow. Keep in mind that each group can only have 1 actual leader, fire team members must be grouped to the squad leader, even if they will be directly following their team lead.
Another "feature" you should be aware of is that the first units placed down will be the first displayed on the slotting screen. Groups are ordered based on the order their leaders were put down. Slots within groups will also be ordered based on when each unit was placed. In order for the CBA Group Names feature to work properly, the Squad Leader MUST be the first unit placed down in a squad.
2.2 Squad Composition
When using the XP Template, the easiest way to set up a squad is by placing down vanilla BLUFOR (Nato), OPFOR (CSAT), or INDEPENDENT (AAF) units and changing their loadouts via the arsenal, then exporting them to the XPTLoadouts format. Ghost of Officer O’Mally has a very good tutorial on how to do this.
Because of the awkward unit ordering addressed in the overview, I recommend starting by placing down a Commander (usually an Officer) first, just to make the copy and paste re-ordering that you will almost certainly do later easier.
Good squad size is usually 8 to 12 units (I strongly recommend not going above 13). You should keep in mind what transport options you are giving the players. For example, a mechanized force will have squad size limited to how many infantry can fit as passengers in their APCs. It is almost always a logistical pain in the ass to not be able to transport a full squad.
For what roles you should have in your squad, the key roles are:
- Squad Leader
- Medic
- Team Leader(s)
This is the skeleton from which all squads are built. Keep in mind that fire teams are 3-4 people (including Team Leads) and TMTM usually has 2 teams in a squad. For a 12 man squad, a third team is recommended. 10 people is a good squad size for most ops. Fill up the rest of the squad with roles that will be useful for your op.
It is also important to keep in mind how these roles will be broken down into teams. Many Squad Leaders like to break their squads into three parts: The "Command" element, consisting of the Squad Leader and Medic, the "Support" element, consisting of autoriflemen and marksmen, and the "Maneuver" element, consisting of anti-tank weapons, riflemen, and grenadiers.
This is not a hard and fast rule, but keep in mind how a Squad Leader might distribute roles across their teams when deciding on squad composition.
The following 10 man squad is a good framework to work off of. Try to keep the Squad and Team Lead structure in mind, but swap out roles as you see fit.
| Squad Leader | Team Leader | Team Leader |
| Medic | Role | Role |
| Role | Role | |
| Role | Role |
Design Opinions
Superxpdude: "There’s no such thing as a "perfect team composition" for all missions. Your team composition should be based on the mission itself. As an example, if you’re going to be in towns the whole time, clearing out buildings, you might not want to have roles dedicated to long-range fighting (such as marksmen or long-range AT)."
Trenchgun: "I like to make teams identical when I can. I feel this lets the Squad Leader alternate which team is the maneuver team and which is the support. It can give Squad Leaders more flexibility when making plans."
The final step is to make sure that every friendly unit has its Playable box checked. You will know that a unit is Playable when it has a pink/purple circle around its icon. A Player unit (what you play as in a single player scenario) counts as a playable unit but is denoted by a red circle.
2.3 Essential
While the equipment and weapons you give players is entirely dependent on your mission and player roles, there is some gear that will be necessary across the board. For this section, I will use "infantry" to describe the average infantryman and what gear they should have. If a specific unit should have specific gear, I will refer to that unit by name.
2.3.1 Medical
Every unit should get a selection of Personal Aid items (usually in their uniform) and Medics should get medical supplies in their backpack in addition to their own Personal Aid items. The following is recommended, but ultimately the medical supply distribution is dependent on your mission.
| Personal Aid | Medic Backpack |
|---|---|
| 10-12 bandages (basic) 1-2 morphine 2-4 epinephrine 2-4 adenosine (optional) 4 tourniquets (optional, recommended) |
30-40 bandages (basic) 10-12 morphine 20-24 epinephrine 15-10 adenosine (optional) 1 PAK 4-5 250mL blood (or saline/plasma) 4-5 500mL blood (or saline/plasma) 4-5 1000mL blood (or saline/plasma) |


