Mission Making Toolbox
By Trenchgun
with help from:
Superxpdude, Keth
exported to wiki by blah2355
If you prefer to see the google docs version go here
Introduction
Overview
The purpose of this guide is to give you the skills and knowledge to make a basic operation for TMTM. There will be some basic scripting, but it will not cover advanced scripting topics. This will give you the tools to create an op that is playable and works properly. Additionally, this is not a tutorial to create the missions to the preference of any one person. The few sections where mission design is brought up is meant to encourage mindfulness and critical thought when designing your own op.
Look out for Design Opinion blurbs where mission makers offer design input about certain topics. These sections are neither right nor wrong, but simply advice from experienced mission makers.
There is a list on the top of this wiki that will let you jump to any section. If you are already familiar with making missions but are looking for something specific, feel free to jump to the relative sections. However, if you are making your first mission, it is strongly recommended that you go through this document section by section.
Setting Up the Editor
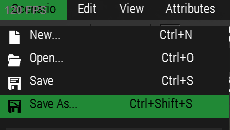
The first thing you’ll want to do is open up the editor and select what map you’d like to make a mission on. Click Scenario>Save As (or Ctrl+Shift+S) and save your mission.
Before even typing a name, make sure the box labeled Binarize the Scenario File is left unchecked. Leaving it checked will encrypt parts of your mission file and prevent either auditors or yourself from editing your mission.sqm should addon issues arise (while you are at it, go to Settings>Preferences in the editor and make sure that Binarize New Scenario Files is unchecked).
Its name doesn’t have to be final, but I typically prefix it with the type of mission I’m making and then give it a descriptive working title. Arma cannot read many special characters, most notably spaces (it replaces them with '%20'), so be sure to use underscores. Stick to standard letters, numbers, underscores, and dashes.
- coop_zargabad_defense
- coop_stratis_invasion
- tvt_russian_rebels
- cotvt_rogue_nato
Once you’ve done this, you can set up Superxpdude’s XP Template.
Setting Up the XP Template
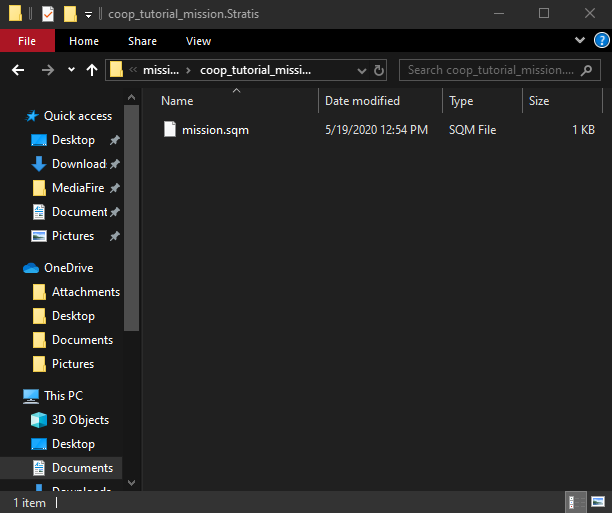
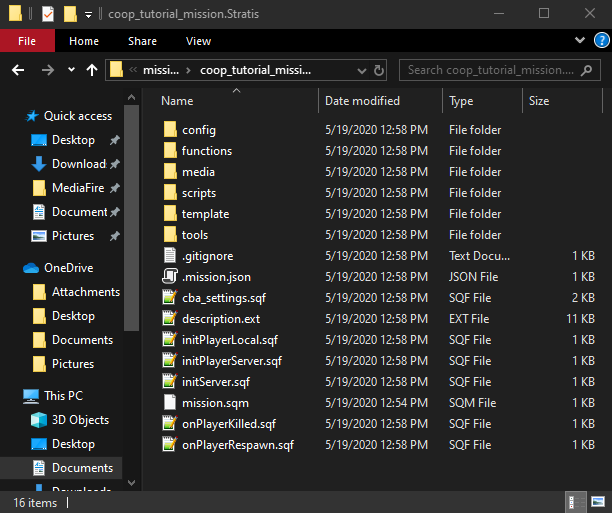
To set up the XP Template in your mission, navigate to the template repository and download the latest release as a zip file, then copy the contents into your mission directory. Your mission directory can be found in either Documents/Arma 3/missions or Documents/Arma 3 - Other Profiles/your username/missions. Take a minute or two to snoop around the files if you like, but we will be returning to the important parts later.
Left: Your mission folder just after its initial save
Right: Your mission folder after adding the XP Template
Description.ext
The description.ext file can be found in your mission root. This is the core of the information and settings of your mission. You are encouraged to explore it on your own, but for now we will only worry about several sections.
Mission Information
This section should be almost completely filled out (it doesn’t have to be when you start on your mission, but it most certainly has to be before submitting it for audit).
Mission naming procedures can be found in section Naming Format. The onLoadName and onLoadMission entries can be much more informal.
minPlayers should always be 1, but maxPlayers should be equal to the number of playable units in the mission plus the number of Zeuses and headless clients (usually 3-6 extra slots). It is a good idea to future proof ops by having 50-60 slots available. It is always better to have too many slots than to have not enough on op night because If the number of players that show up for an op exceeds the number of slots in the mission, an alternative backup mission will be played instead.
Enable XPT Loadouts
Around line 35 is the line:
//#define XPT_DEFINE_CUSTOMLOADOUTS 1
Uncomment this line (remove the leading "//") to enable XPT Loadouts. You will get errors when you launch your mission if you try playing it as a unit that does not have a loadout defined in XPTLoadouts.hpp, so it might be worth doing this after setting up your loadouts.
Respawn Setup
Around line 95 is the Respawn section. Respawn should be set to 3, which will allow players to respawn at a point you specify in section Respawns.
respawnDelay can be anything, but it is recommended NOT to go over 3 minutes. Keep in mind that this is the time spent at the respawn screen, not unconscious bleeding out, nor being transported back to the front.
Friendly Forces
Overview
When setting up the force composition for players you will need to form squads out of various roles, creating different types of squads by varying those squads. You will need to have a Command squad, infantry squads, and any sort of support or force multiplier squads.
Each unit you intend to be controlled by a player needs to have the "playable" box checked in its 'unit attributes' menu (this can also be done via the group’s attribute menu to avoid opening the attributes menu on each unit). You can group units together by clicking a unit once to select it, then ctrl+click and drag to the unit you want the selected unit to follow. Keep in mind that each group can only have 1 actual leader, fire team members must be grouped to the squad leader, even if they will be directly following their team lead.
Another "feature" you should be aware of is that the first units placed down will be the first displayed on the slotting screen. Groups are ordered based on the order their leaders were put down. Slots within groups will also be ordered based on when each unit was placed. In order for the CBA Group Names feature to work properly, the Squad Leader MUST be the first unit placed down in a squad.
Squad Composition
When using the XP Template, the easiest way to set up a squad is by placing down vanilla BLUFOR (Nato), OPFOR (CSAT), or INDEPENDENT (AAF) units and changing their loadouts via the arsenal, then exporting them to the XPTLoadouts format. Ghost of Officer O’Mally has a very good tutorial on how to do this.
Because of the awkward unit ordering addressed in the overview, I recommend starting by placing down a Commander (usually an Officer) first, just to make the copy and paste re-ordering that you will almost certainly do later easier.
Good squad size is usually 8 to 12 units (I strongly recommend not going above 13). You should keep in mind what transport options you are giving the players. For example, a mechanized force will have squad size limited to how many infantry can fit as passengers in their APCs. It is almost always a logistical pain in the ass to not be able to transport a full squad.
For what roles you should have in your squad, the key roles are:
- Squad Leader
- Medic
- Team Leader(s)
This is the skeleton from which all squads are built. Keep in mind that fire teams are 3-4 people (including Team Leads) and TMTM usually has 2 teams in a squad. For a 12 man squad, a third team is recommended. 10 people is a good squad size for most ops. Fill up the rest of the squad with roles that will be useful for your op.
It is also important to keep in mind how these roles will be broken down into teams. Many Squad Leaders like to break their squads into three parts: The "Command" element, consisting of the Squad Leader and Medic, the "Support" element, consisting of autoriflemen and marksmen, and the "Maneuver" element, consisting of anti-tank weapons, riflemen, and grenadiers.
This is not a hard and fast rule, but keep in mind how a Squad Leader might distribute roles across their teams when deciding on squad composition.
The following 10 man squad is a good framework to work off of. Try to keep the Squad and Team Lead structure in mind, but swap out roles as you see fit.
| Squad Leader | Team Leader | Team Leader |
| Medic | Role | Role |
| Role | Role | |
| Role | Role |
Design Opinions
Superxpdude: "There’s no such thing as a "perfect team composition" for all missions. Your team composition should be based on the mission itself. As an example, if you’re going to be in towns the whole time, clearing out buildings, you might not want to have roles dedicated to long-range fighting (such as marksmen or long-range AT)."
Trenchgun: "I like to make teams identical when I can. I feel this lets the Squad Leader alternate which team is the maneuver team and which is the support. It can give Squad Leaders more flexibility when making plans."
The final step is to make sure that every friendly unit has its Playable box checked. You will know that a unit is Playable when it has a pink/purple circle around its icon. A Player unit (what you play as in a single player scenario) counts as a playable unit but is denoted by a red circle.
Essential
While the equipment and weapons you give players is entirely dependent on your mission and player roles, there is some gear that will be necessary across the board. For this section, I will use "infantry" to describe the average infantryman and what gear they should have. If a specific unit should have specific gear, I will refer to that unit by name.
Medical
Every unit should get a selection of Personal Aid items (usually in their uniform) and Medics should get medical supplies in their backpack in addition to their own Personal Aid items. The following is recommended, but ultimately the medical supply distribution is dependent on your mission.
| Personal Aid | Medic Backpack |
|---|---|
| 10-12 bandages (basic) 1-2 morphine 2-4 epinephrine 2-4 adenosine (optional) 4 tourniquets (optional, recommended) |
30-40 bandages (basic) 10-12 morphine 20-24 epinephrine 15-10 adenosine (optional) 1 PAK 4-5 250mL blood (or saline/plasma) 4-5 500mL blood (or saline/plasma) 4-5 1000mL blood (or saline/plasma) |
Radios
Typically, every unit will have a radio of some kind. Generally, Squad Leads will get a TFAR long range radio backpack to communicate with other squads, assets, and command, and a short range radio to communicate with their squad. The short range radios are as follows:
| BLUFOR | INDEPENDENT | OPFOR |
|---|---|---|
| RF-7800S-TR (2km) AN/PRC-152 (5km) |
AN/PRC-154 (2km) AN/PRC-148 JEM (5km) |
PNR-1000A (2km) FADAK (5km) |
The 2 km radios are your go-to for the average infantryman. The 5 km radios are technically long ranges, just not manpacks. The 2 km radios, however, cannot set themselves to custom frequencies, only change between preset channels. If you plan to equip players with 2 km radios, be sure to give them the MicroDAGR Radio Programmer (watch slot) so that they can change frequencies. You CANNOT set alternates on 2 km radios, so I recommend either giving everyone 5 km radios, or give Squad Leads, Team Leads, and Medics 5 km radios and all other infantry 2 km ones.
You do not need to give radios to anyone but Squad Leads or RTOs, but Arma 3 is a video game and TFAR is a mod. It is harder to communicate as effectively online without radios than it is in real life. It is highly recommended to give all players radios. Making a limited radios mission takes a much higher degree of design knowledge, and the mission must be constructed from the ground up with limited radios in mind.
GPS
For the majority of TMTM ops, every unit has a GPS of some kind. We use devices from the addon cTab. Squad Leaders (and sometimes Team Leaders) should get Android devices, infantry should get MicroDAGRs, and the commander should get the Commander Tablet.
Much like with Radios, no-GPS ops have a caveat. They require the mission to be built from the ground up with no-GPS in mind. It is highly recommended to give all players GPS until you have more mission making experience.
Weapons and Ammo
For most missions, it’s a good idea to have roles use the same type of ammunition for ease of resupply and ammo sharing. Giving Autoriflemen or Machinegunners tracer ammunition is highly recommended. Tracers for Squad and Team Leaders can also be a good idea, or at least giving them half and half.
Design Opinions
Trenchgun: “Magnified optics should be given out sparingly. They are a massive force multiplier, greatly increasing the effective range of infantry. An Autorifleman becomes a monster. No magnified optics makes an Autorifleman rely on an Asst. Autorifleman with binoculars to reliably engage long range targets. This will also boost the usefulness of your Marksmen.”
Superxpdude: “Personally I like to give everyone pure Tracer mags (unless the op is intended to be a stealth mission). CUP optics and attachments generally perform better than their RHS counterparts (since they generally employ standard Arma/CBA functionality for keybinds and such). The MRCO is always a solid choice for a lightly magnified optic.”
Keth: “Be sure to test out the players equipment vs the enemies, including AT and vehicles. Friendly weapons vs enemy vests/helmets and whatnot.”
CBA Role Descriptions
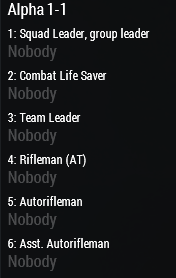
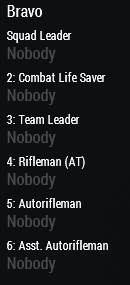
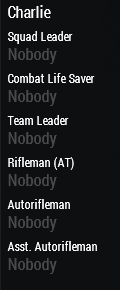
By default, the mission slotting screen will display group names in the format Alpha 1-1. You can make this display whatever name you want by changing the role description of a group’s leader to "Role Name@Group Name". You should also write role descriptions for all of your slots to remove the numbers next to names on the slot screen.
Left: slot screen with no CBA role description.
Center: group leader role set to "Squad Leader@Bravo"
Right: group leader role set to "Squad Leader@Charlie" and squad role descriptions set.
Force Multipliers
You should carefully consider all assets you give to players. Giving too powerful or too many force multipliers can cause an imbalance of enjoyment between assets and infantry. This balance can be hard to achieve and is more dependent on both the enemies you place down and your mission making experience. Try to create dependencies between ground troops and armored or air assets.
Additionally, keep in mind logistics for your assets. Is there a logistics team that can handle rearming, repairing, and refueling assets? Could this vehicle be sling loaded by logistics helicopters if necessary? Is there transport for squads?
Design Opinions
Trenchgun: “I find it is a good idea to have your assets pulling double duty as much as possible. Logistics helicopters should be able to provide transport as well as resupply. APCs/IFVs can support infantry and transport them as well (but make sure squads can fit in them if you plan a mechanized op).”
Superxpdude: “While it might be exciting to add a bunch of assets (particularly aircraft) to your mission. It is vastly more difficult to balance a mission around powerful assets (such as tanks, attack helicopters, or fixed-wing aircraft). I recommend making a few missions without these assets to get a better idea of mission balancing in general before using any heavy force multipliers.”
Respawns
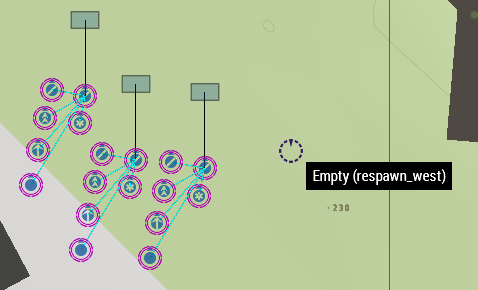
Respawns can be set up by placing a marker and naming it respawn_west (BLUFOR), respawn_east (OPFOR), or respawn_guerrila (Independent). You can use any marker you like and place it where you would like players to respawn.
If you would not like the respawn location to be visible on the map, you can use the Empty marker (found at Markers>System>Empty).
An Empty map marker that will let BLUFOR units respawn on it.
Vehicle Respawns
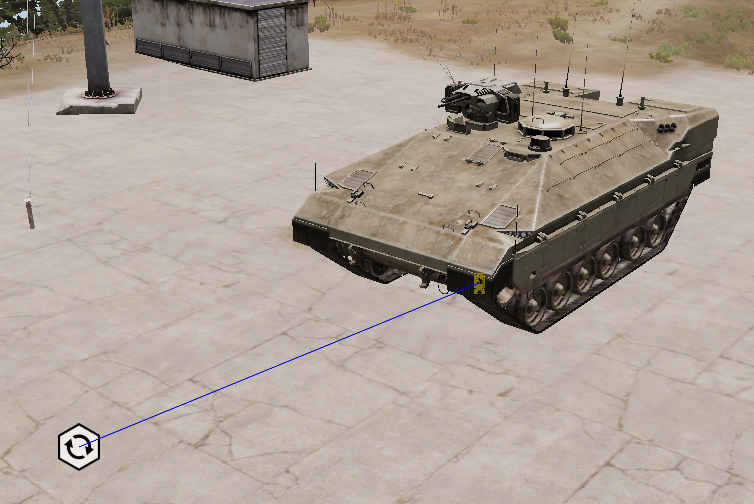
Vehicle respawns can be set up with the Vehicle Respawn module from the editor, found under Systems>Modules>Multiplayer>Vehicle Respawn. Place one of the modules and open up its properties.
The important sections are: Delay, which controls how many seconds it will take for the vehicle to respawn after being destroyed (This time is up to you, make sure you keep in mind how many seconds it takes for a player to respawn). Position, which will determine where the vehicle will respawn at (for almost all cases, Starting position should be selected). Notification, if enabled, will show a popup notification for all players when the vehicle has respawned (this is up to you). All other options are more advanced and you may activate, deactivate, or test on your own. Some provide advanced functionality.
Lastly, you should right click on the Vehicle Respawn module and select Sync to and then click on a vehicle you want to enable respawn on. Repeat this and sync all the vehicles you want to respawn to the module.
Objectives and Tasks
Mission Flow
There are two general ways to structure your mission’s objectives. One way is to have all objectives presented at the beginning of the mission and let players choose the order in which they are accomplished. The other way is to have a handful of initial objectives and dynamically reveal more over the course of the op.
All Objectives at Start
This is the easier structure to implement. You only need to write triggers that check for the completion of objectives. These also allow for the operation commander to develop a more concrete plan with multiple stages.
Dynamic Objectives
This option is a little more difficult. You must write triggers that check for the completion of objectives and then also create new objectives at the same time. This method keeps operation commanders on their toes, causing them to adapt and overcome the changing conditions of the op.
Thoughts
These methods are two ends of a spectrum. Using dynamic objectives allows you to leave twists or surprises for your op. At the same time, it can be frustrating for a commander when your plans are constantly disrupted. Like all things, a good op should have a balance between these styles.
All objectives at start is the recommended method for new mission makers. It is the easiest to implement and unlikely to have errors that affect the whole mission.
Creating Tasks
Navigate to mission_name/scripts/tasks.sqf and open it. Here you will find some commented out example code for using the function BIS_fnc_taskCreate. We will be adding tasks underneath the final line that says // Place tasks here. Add the following block of code:
[
    true,
    ["task name", "parent task name"],
    ["description", "title", ""],
    [0,0,0],
    "CREATED",
    10,
    true,
    "attack",
    true
] call BIS_fnc_taskCreate
I will walk through each of these parameters and what they do. Reading the comments in the example code at the top of tasks.sqf will also be helpful, but I will go more in-depth here. The parameters are listed below in order. Keep in mind that tasks display on the map screen in the order they were created.
Parameters:
owner: the sides, groups, or units that can see the task on their map screen and on their HUD.
options:
* true - this task will be visible to every playable unit.
* blufor, opfor, independent, civilian - this task will be visible only to units on the side specified.
* group - you can use the variable name of a group to make a task visible to them only (advanced).
* unit - you can also make a task visible to a specific unit using that unit’s variable name (advanced).
* The final option is an array of multiple types of the above. Since Zeus’s are excluded from the "true" parameter, you can give tasks to all units and Zeuses by referencing their variable names like so:
[true, “zeus_1”, “zeus_2”],
You can also use this method to give tasks to BLUFOR and Independent, but not OPFOR.
taskID: the internal ID for referencing the task. Players won’t ever see this name, but you will need to know it in order to mark tasks as completed or check for their completion. You can set this to either a single string (i.e. "task_name") or an array of two strings (i.e. ["task_name", "parent_task_name"]) to indicate that this task is a subtask of the parent. The task will appear nested under its parent.
Your taskIDs should be descriptive, but not too verbose that you can’t remember it. You also must use underscores rather than spaces in the name.
description: This array of strings is the task description and title visible to players on the map screen. The first string is your description, the second is the title. The third is unused and can be left blank.
You may be tempted to write detailed descriptions of your tasks here. This is not the place. Players rarely read task descriptions. You should make these brief summaries (or leave them blank) they should not contain any information not already present in the briefing.
destination: This is the position that the task will appear on the map.
options:
* [x,y,z] - an array of coordinates specifying the position. Somewhat clunky to use.
* Object - you can give an object as well. The task will appear at the exact location of the target. If you give the variable name for a unit, the task location will follow that unit throughout the mission.
* ObjNull - using this value will cause the task to not have a location. This is primarily used for parent tasks (i.e. a larger task of "secure a town" with smaller subtasks of "take out the FOB", "destroy the ammo cache", etc.). You can use this if you want to use tasks for mission flow, but use your own map markers to indicate objective locations.
A tip if you would not like to indicate the exact location of an objective via the task: Search "helipad" in the empty units section of the editor and place down an Invisible Helipad. Set the variable name of this helipad to something descriptive (I usually use the format "taskname_pos") and set the task destination to the invisible helipad. This method is useful for objectives where players must search a predefined zone for a target. You want players to have to search the zone, not be given a global waypoint to the target. Place the task location at the center of the search zone to better indicate where players should search.
state: This is the task state, if it has been created, is assigned, failed, or succeeded. Most are self-explanatory.
options:
* "CREATED" - the task is created but unassigned. This is what you will typically use.
* "ASSIGNED" - the task starts already having been assigned to the units that are its owner.
* "AUTOASSIGNED" - will be assigned when no task has yet been assigned.
* "SUCCEEDED" - the task was successfully completed. Usually, you won’t create a task in this state but will change to it later.
* "FAILED" - the task was not completed. Same circumstance as the previous.
* "CANCELLED" - the task is no longer relevant. Use it the same as the previous two states.
priority: The priority is simply a number that helps determine what order the tasks will be auto-assigned in. A higher number has greater priority. If you would like the task to not be auto-assigned, use the value -1.
showNotification:
options:
* true - a popup notification will play every time the task state changes.
* false - no popup will display.
type: This is the task icon. Icons can be found at the bottom of this page.
visibleIn3D:
options:
* true - the task will be visible on a player’s 3D HUD, displaying the distance and position to the player at all times.
* false - the task position will only be visible in the map screen and no distance will be shown.
(NOTE: This has not been thoroughly tested, but is what the BI documentation states. Players may still see the 3D marker if they have the task assigned)
Check Task Complete: Not Alive Triggers
Many new mission makers have a little difficulty in finding objective ways to check for the completion of a relatively abstract task. For example, "capture the town" could be seen as "remove all the enemies", but that is a little more difficult to test for. Without writing a complex trigger to check for ratios of forces in a town, you would have to track down every single enemy and kill them. Instead, it is much easier to break a task like "capture the town" into "kill the rebel commander", "destroy the weapon cache", and "destroy the radio tower". It is very easy to check if something is destroyed or killed in Arma, and our example objective of capturing a town is now only a single line of code:
!alive rebel_officer && !alive weapon_cache && !alive radio_tower
Let’s work through the officer objective as an example.
Place down an officer and a trigger with no radius.
I will make the unit’s variable name "enemy_officer".
Next, open up the trigger. For the majority of these types of triggers, they should have the Repeatable box unchecked and the Server Only box checked. This will make sure the task only executes once, and that the conditions are only checked on the server, reducing the chance of locality issues. Now, in the Condition box, write:
!alive enemy_officer
In order to test, in the On Activation box write:
hint "officer killed"
Now place a player unit, test the mission, and kill the officer. You should get a hint popup that the officer has been killed. Congratulations! That is the basis for completing an objective. Now we must make the trigger update our tasks on activation.
In order to change the state of a task, we use the following line of code:
["task_name", "SUCCEEDED"] call BIS_fnc_taskSetState;
"task_name" is the taskID you set when creating the task in tasks.sqf. Remove the line displaying the hint and test the mission again. If your task was initialized properly, it will change to completed upon the death of the officer.
This type of trigger is not limited to only human units. By checking if a unit is not alive, you are essentially checking if an object is destroyed or killed. You can use this on vehicles or destructible objects as well.
Check Task Complete: Hold Actions
This section will cover adding and using Hold Actions. Hold Actions are those fancy things that let a player walk up to an object, press a button for a certain amount of time, and execute some code on completion. These pieces of code should be written in your initPlayerLocal.sqf file located in the root of your mission file.
Here is example of the BIS_fnc_holdActionAdd function for "hacking" a laptop:
[
    hackable_laptop,
    "Hack Laptop",
    "\a3\ui_f\data\IGUI\Cfg\holdactions\holdAction_connect_ca.paa",
    "\a3\ui_f\data\IGUI\Cfg\holdactions\holdAction_connect_ca.paa",
    "_this distance _target < 3 && !('task_hacklaptop' call BIS_fnc_taskCompleted)",
    "_caller distance _target < 3 && !('task_hacklaptop' call BIS_fnc_taskCompleted)",
    {},
    {},
    {["task_hackLaptop", "SUCCEEDED"] call BIS_fnc_taskSetState},
    {},
    [],
    12,
    0,
    false,
    false
] call BIS_fnc_holdActionAdd;
There’s a lot of functionality that BIS_fnc_holdActionAdd provides and it does get very complicated. This section will focus on a simple implementation that will have a task’s state be set as succeeded when a player uses a hold action. Since hold actions have a lot more moving parts, I will more directly reference my example of hacking a laptop.
Parameters:
Target: This is the variable name of the object or the unit that the hold action will be attached to. In our example, "hackable_laptop" is a laptop prop I’ve placed on the map.
Title: This is a string that is the prompt text for the hold action. In our example, it simply says "Hack Laptop". In-game, this appears as "Hold Space to Hack Laptop" (or whatever key the player has bound for Hold Actions).
idleIcon: This is the icon that appears in the initial prompt. You should leave as in our example, but check the show text option at the top of this page.
progressIcon: This is the icon that appears while the hold action is being activated. You should leave this as in our example, but check the show text option at the top of this page.
conditionShow: This is the conditional statement that will make the hold action appear on a player’s screen. In our example, it will appear when the _this (player) is 3 meters from the _target (laptop). We also check to make sure that the task that the hold action will complete is not completed. You should leave this as-is, but modify the task name you check to suit your mission.
conditionProgress: This is the conditional statement that will let the player continue to activate the hold action. In our example, the hold action will disappear if the _caller (player) goes further than 3 meters away from the _target (laptop). Like conditionShow, we also check to make sure that the task hasn’t been completed yet. You should leave this as-is, but modify the task name you check to suit your mission.
codeStart: This is a chunk of code that will execute when a player starts activating the hold action. You can usually leave this blank unless you want to do something specific.
codeProgress: This is a chunk of code that will execute every tick the hold action is being activated. You can usually leave this blank unless you want to do something specific.
codeCompletion: This is a chunk of code that will execute once the hold action has been completed. In our example, it calls BIS_fnc_setTaskState on our task_hackLaptop task.
codeInterrupted: This is a chunk of code that will execute if the hold action is canceled before completion. You can usually leave this blank unless you want to do something specific.
arguments: This is an array of variables that will be passed to functions executed in the code parameters. This can usually be left blank unless you want to do something specific.
duration: This is an integer that is the number of seconds the hold action takes to complete.
priority: This is the priority, what order (top to bottom) that the hold action will appear in the action menu when there are multiple hold actions available to a player.
removeCompleted: A boolean value (true/false). If true, the hold action will disappear for a player after they have activated it. In our example, we leave this as "false", since our conditionals will prevent the hold action from appearing if the task is complete (this is a more robust and reliable method).
This formula is an abstraction that can be applied to a wide range of objective types: hack a laptop, destroy evidence, sabotage radio systems, search a person for intel, etc.
Advanced Task Triggers
These two methods will get you a lot of mileage. More specific triggers or checks may require more complicated scripting. Feel free to ask in #arma-dev for advice on how to approach the tasks you’d like to implement.
Add Task Mid-Mission
If you are using the "Dynamic Objectives" method rather than the "All Objectives at Start" method, you will need to use the BIS_fnc_createTask again. Instead of putting it in tasks.sqf, you will have to put it in the On Activation box of a trigger.
If you want to add a new objective after completing a single objective, it’s as easy as calling BIS_fnc_createTask in the On Activation box of the trigger checking for that objective’s completion.
If you’d like to add a new task after several objectives have been completed, you will need to place down a new trigger and use a combination of the following functions to check if the objectives have been satisfied.
"task_name" call BIS_fnc_taskExists Returns true if the task exists. Useful because the other functions will cause errors if called on tasks that do not yet exist.
"task_name" call BIS_fnc_taskCompleted Returns true if the task’s state is "SUCCEEDED", "FAILED", or "CANCELLED". Useful if you just want to check that the objective was completed in some capacity and not necessarily successful.
"task_name" call BIS_fnc_taskState Returns a string of the task’s current state. Useful if you want something to occur ONLY if a task resulted in a specific state.
Using BIS_fnc_taskCompleted in your Condition as follows:
NEEDS UPDATING
It’s necessary to wrap our checks for BIS_fnc_taskCompleted in an if statement checking if the tasks exist because, using the "Dynamic Objectives" method, we might not have created the tasks we are checking for yet. It is impossible for Arma to know about tasks until they have been created. If you want to check for more than 2 objectives, simple copy lines 2 and 7, pasting them directly below 2 and 7, respectively, and changing the task name as appropriate.
Similarly, if we wanted to check if several specific objectives have been set to a specific state, rather than use BIS_fnc_taskCompleted, use instead:
((“task1” call BIS_fnc_taskState) == “SUCCEEDED”)
Replace “SUCCEEDED” with “CREATED”, “FAILED”, or “CANCELED” as necessary.
Briefing Config
The bulk of briefing writing is very straightforward. Navigate to your mission folder and go to mission_name/config/XPTBriefings.hpp. Superxpdude has this file well commented so I will talk more about what to put in your briefing.
By default, the template has three sections: the situation (a brief overview of the mission’s purpose), the mission (an in-depth summary of what the objectives will be and what players should expect from enemies), and the assets (what force multipliers or special equipment players have access to and if they will respawn).
You can of course split these sections up or add sections as you see fit. It is not recommended to have so much that it takes commanders several minutes to read and comprehend the briefing.
Additionally, keep in mind that TMTM places the burden of planning on the operation commander. It is not recommended to provide a detailed plan for the op. Feel free to suggest certain avenues of approach as appropriate, or make clear in a briefing section when an op is meant to be played in a way atypical to the TMTM norm.
Ending the Mission
End Trigger
An end trigger is very simple. Follow the procedure found in Add Task Mid-Mission, but instead of creating a new task, use the following function:
“EveryoneWon” call BIS_fnc_endMissionServer;
Make sure that the trigger is NOT Repeatable and IS Server Only.
Debrief Config
If you would like to have a custom end card or multiple possible end cards, you will need to set up custom endings with CfgDebriefing.hpp, found at mission_name/config/CfgDebriefing.hpp.
This file is similar to XPTBriefings.hpp and Superxpdude has it well commented. The difference here is that when you make a new ending, the class name is what you use to get your unique ending.
class myEnding
{
    title = “My Custom Ending”;
    subtitle = “Wow we did it!”;
    description = “Long live Goober!”;
};
The class name in the above code would be "myEnding". You use this in BIS_fnc_endMissionServer to display your custom ending like so:
“myEnding” call BIS_fnc_endMissionServer;
Enemy Forces
Zeus Setup
Zeus is not necessary for your mission, but it is a useful thing to have implemented. It will let you actively moderate your op to allow for smoother or more carefully constructed encounters to occur. It is also a good way to future proof ops for replay. Zeuses can alter how a mission plays to allow for better replayability.
To set up Zeus, you need two objects found at Systems>Modules>Zeus>Game Master and Systems>Logic Entities>Virtual Entities>Zeus. Place these on the map and sync them with each other by Right Click>Connect on one than selecting the other.
The Game Master module should be set up like this:
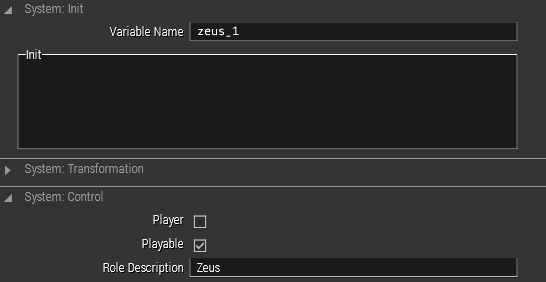
And the Zeus entity should be set up like this:
Make sure that the Owner of the Game Master module and the Variable Name of the Zeus entity are the same. They can be whatever you like, but they should be identical. If you have more than 1 Zeus, you will need to have different Owner/Variable Names for each.
Dynamic Simulation
When placing units, be sure to check the Dynamic Simulation box in the Special States section of their group properties. Units with Dynamic Simulation will only be activated by the server when a player is within a certain range. This greatly increases the performance of the server, and therefore, the client’s machines during the mission.
There are some units you should not apply Dynamic Simulation to. Anti-Air units that you intend to be used to threaten player air assets should not be on Dynamic Simulation so that they are able to scan and engage player aircraft. Dynamic Simulation should also not be applied to any units that you want to move about even when players are far away.
Balance Considerations
Contact does not have to be spread evenly across the map, but it should be placed in areas that are good defensive positions. You do not need to place enemies in every single building of a town, but you should fortify enough that players clearing the town will not find it uneventful.
Try not to place any enemy assets or contact that the players are not equipped to handle. Likewise, you should not give players equipment and gear that they have no reason to use in a mission (like mine detectors on engineers when there are no mines).
A good total number of enemy infantry is 300-400. This will not be too taxing on the server and generally provides enough contact to keep people busy throughout the op.
The amount and type of contact is hard to provide advice for. This portion of a mission is the most hit-or-miss. Getting a good feel for enemy contact will come with time and practice. If you plan to Zeus your op, ere on the side of too much contact. It is much faster to thin out enemy numbers as Zeus when players are having a tough time then it is to add contact while players are steamrolling.
Headless Client
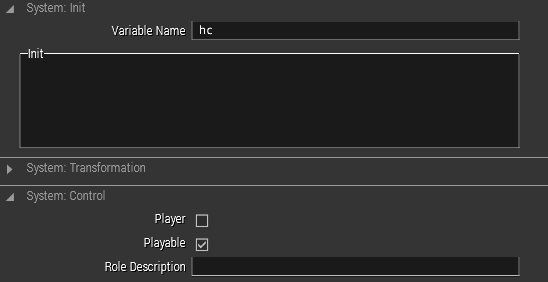
Implementing headless client support is another good way to increase performance during a mission. Headless client setup is easy. Place the HC module (Systems>Logic Entities>Virtual Entities>Headless Client) and open its properties.
Make the variable name "hc" and make sure that it is set to Playable, like so:
Currently, the TMTM server supports 3 headless clients. Make 2 more identical headless client entities but name them “hc2” and “hc3” respectively.
Submitting Mission
Naming Format
Once you are done with your mission and you have your finalized player count, you should return to description.ext in your mission root and set the briefing name.
The briefing name needs to follow the following format:
Type PlayerCount+ZeusCount - Mission Name VersionNumber
Examples of different ops are as follows:
- COOP 52+1 - Daybreak v1.6
- COOP 50 - Counter Strike v1.0
- TVT 70 - Off Point v1.3
- COTVT 54 - Hunger of the Pine v2.1
How you choose to write your version number is up to you, but they must increment in an upwards fashion and it is highly recommended that you use decimals or lettering to indicate minor bug fixes and other changes, and reserve the leftmost number to denote major changes between versions. You can read more about semantic versioning here, but the general structure is:
4.2.1
Major.Minor.Patch
Once you have followed section Exporting Mission, you will also have to name the .pbo file for submission. The .pbo name follows the same format as the briefing name, with some adjustments to account for the more limited characters:
type_playerCount_zeusCount_missionName_version
The same examples from before’s .pbo names:
- COOP_53_Daybreak_v1_6.Altis.pbo
- COOP_50_Counter_Strike_v1_0.Altis.pbo
- TVT_70_Off_Point_v1_3.bysterica.pbo
- COTVT_54_HungerOfThePine_v2_1.Enoch.pbo
Note that the slot count here should reflect the total number of slots (what you put as player count in description.ext) and no periods in the version number. Also, note that the file name ends with .mapName.pbo. The map name is how Arma knows what map your mission is on. That part is necessary and must be exactly as it was when you exported the mission.
Exporting Mission
Once you have checked off on everything needed for your mission, it is time to export. Make sure that the briefingName in description.ext has the right version numbering from any changes you may have made from the previous version and then go to Scenario>Export>Export to Multiplayer in the editor top bar.
Now navigate to your steam install location and find your MPMissions folder (.../Steam/steamapps/common/Arma 3/MPMissions). You should see your mission here with the name it is saved as in your profile mission folder. Name the file according to the conventions in section Naming Format. Congratulations! You have finished your mission and it is now ready to be submitted for audit.
Submitting for Audit
The final step is to submit your op for audit. Go into the TMTM discord to any channel that allows bot commands and upload your mission. In the text portion of the post write $$op_audit, then write any notes you have for the mission auditors on a new line (shift + enter).
Auditors will receive a message that looks like this:
Leaving notes for auditors is almost always a good idea. Let them know if you have any sort of advanced scripting that might require testing. If you are submitting an updated version of a mission that you have already submitted, attaching a changelog of additions, removals, and/or modifications is immensely helpful and will allow your mission to clear audit more smoothly.
Auditors will often get in contact with you to ask questions about your op or check design decisions. They will often help you fix small errors like mistakes in the config. Some problems they find may require you to update and submit a new version of your mission. Some will only require you to send a component file (commonly XPTLoadouts.hpp). Some problems they will fix themselves. Sometimes they may ask you to walk them through parts of your mission or test it on the server. Timely responses to auditors will help your mission clear audit faster.
Useful Links
Google docs version of this page
TMTM Mission Making Guidelines
